You have an idea.
Maybe it is a SaaS product. Maybe it is a developer tool. Maybe it is a tiny AI thing. Maybe it is a new course, app, marketplace, newsletter, or productized service.
At this point, the most important question is not:
Can I build the whole product?
The real question is:
Does anybody care enough to give me their email?
That is why a landing page is one of the best first MVPs you can build.
Not a giant app. Not a dashboard. Not a login system. Not a microservice orchestra wearing a tiny DevOps hat.
A landing page.
One clear promise. One signup form. One database table. One path to launch.
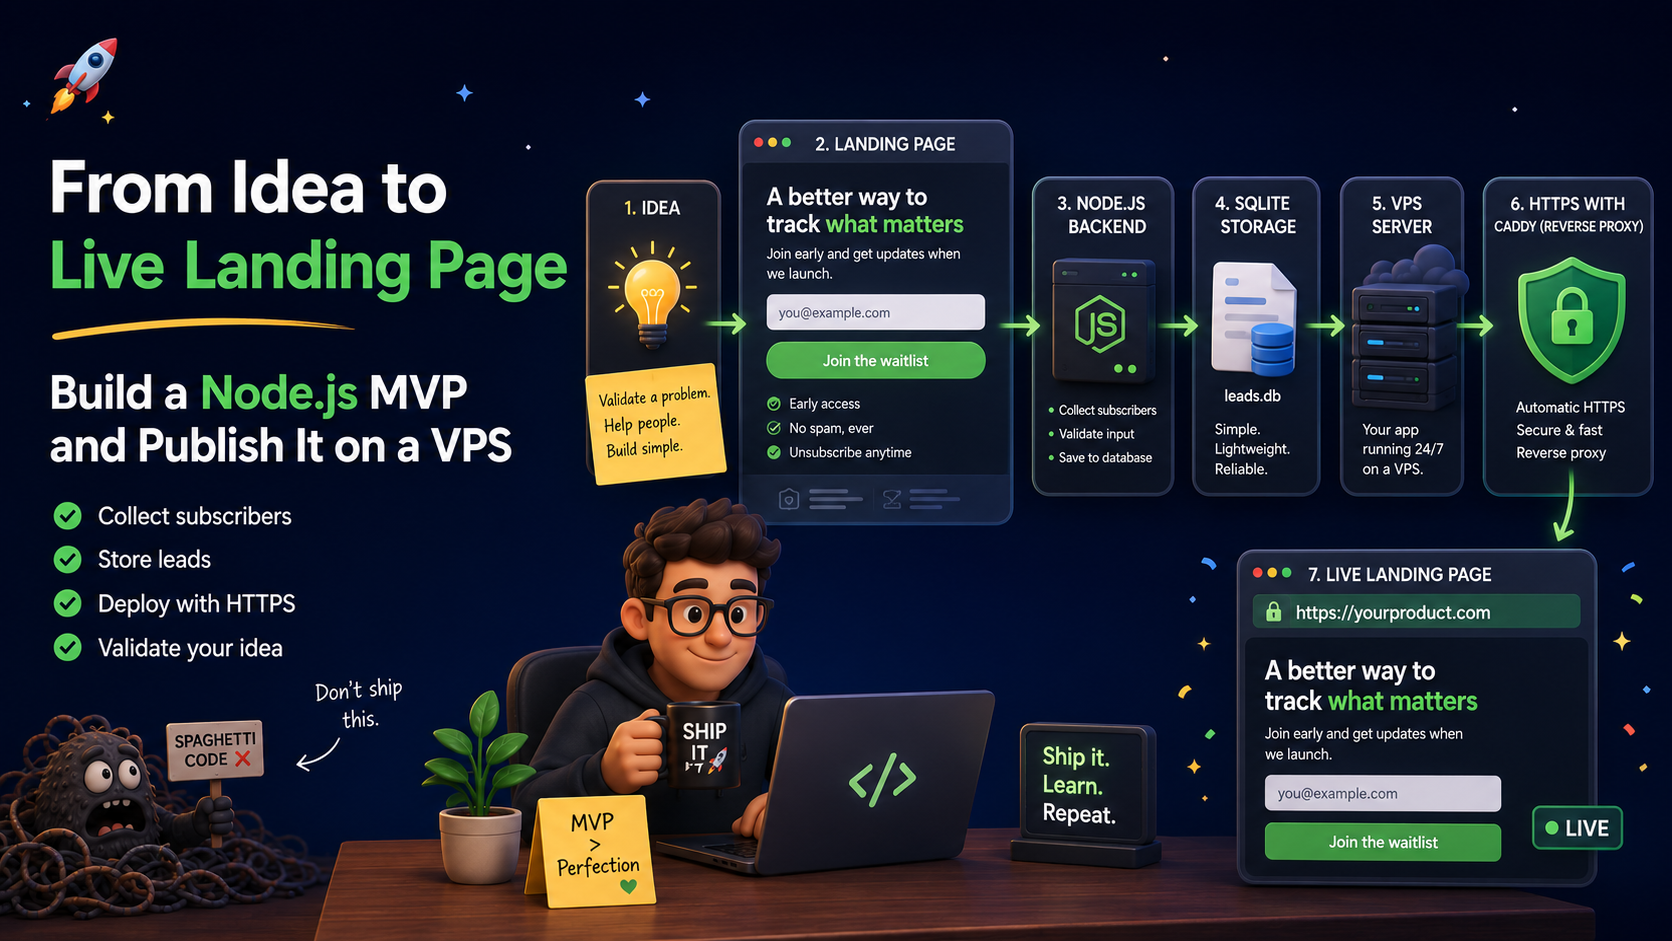
In this article, we are going to build a complete landing page MVP with modern Node.js and publish it to a real VPS.
We will go from idea to live page.
By the end, you will have:
- a product landing page
- a subscriber form
- backend validation
- SQLite storage
- duplicate email handling
- simple spam protection
- admin subscriber export
- clean separated HTML, CSS, and JavaScript files
- a systemd service to keep the app running
- Caddy as a reverse proxy with HTTPS
- a real deployment flow to a VPS
No giant framework. No build step. No “before we start, install 700 packages to render a button.”
Just a clean little MVP that helps you learn if your idea deserves more time.
Let’s build the thing.
The Product Idea
For this article, we will pretend we are launching a product called LaunchKit.
LaunchKit helps founders validate product ideas before they accidentally spend three months building settings pages.
The landing page will say:
Launch less. Learn more.
The page will collect:
- name
- what problem the person wants solved
- source/referrer
That is already enough to start learning.
You do not need user accounts yet. You do not need payments yet. You do not need an admin panel with animated charts yet.
The MVP goal is simple:
Get interested people onto a list and understand why they are interested.
That is the tiny signal machine we are building.
Why Not Just Use a No-Code Tool?
You can.
For many products, a no-code landing page is fine.
But building your own small Node.js landing page gives you more control:
- You own the code.
- You own the data.
- You can customize the flow.
- You can deploy it anywhere.
- You can extend it later into the real product.
- You learn how your product infrastructure starts.
Also, sometimes it is nice to build something small, sharp, and useful without waking the overengineering goblin.
The goblin is already awake enough.
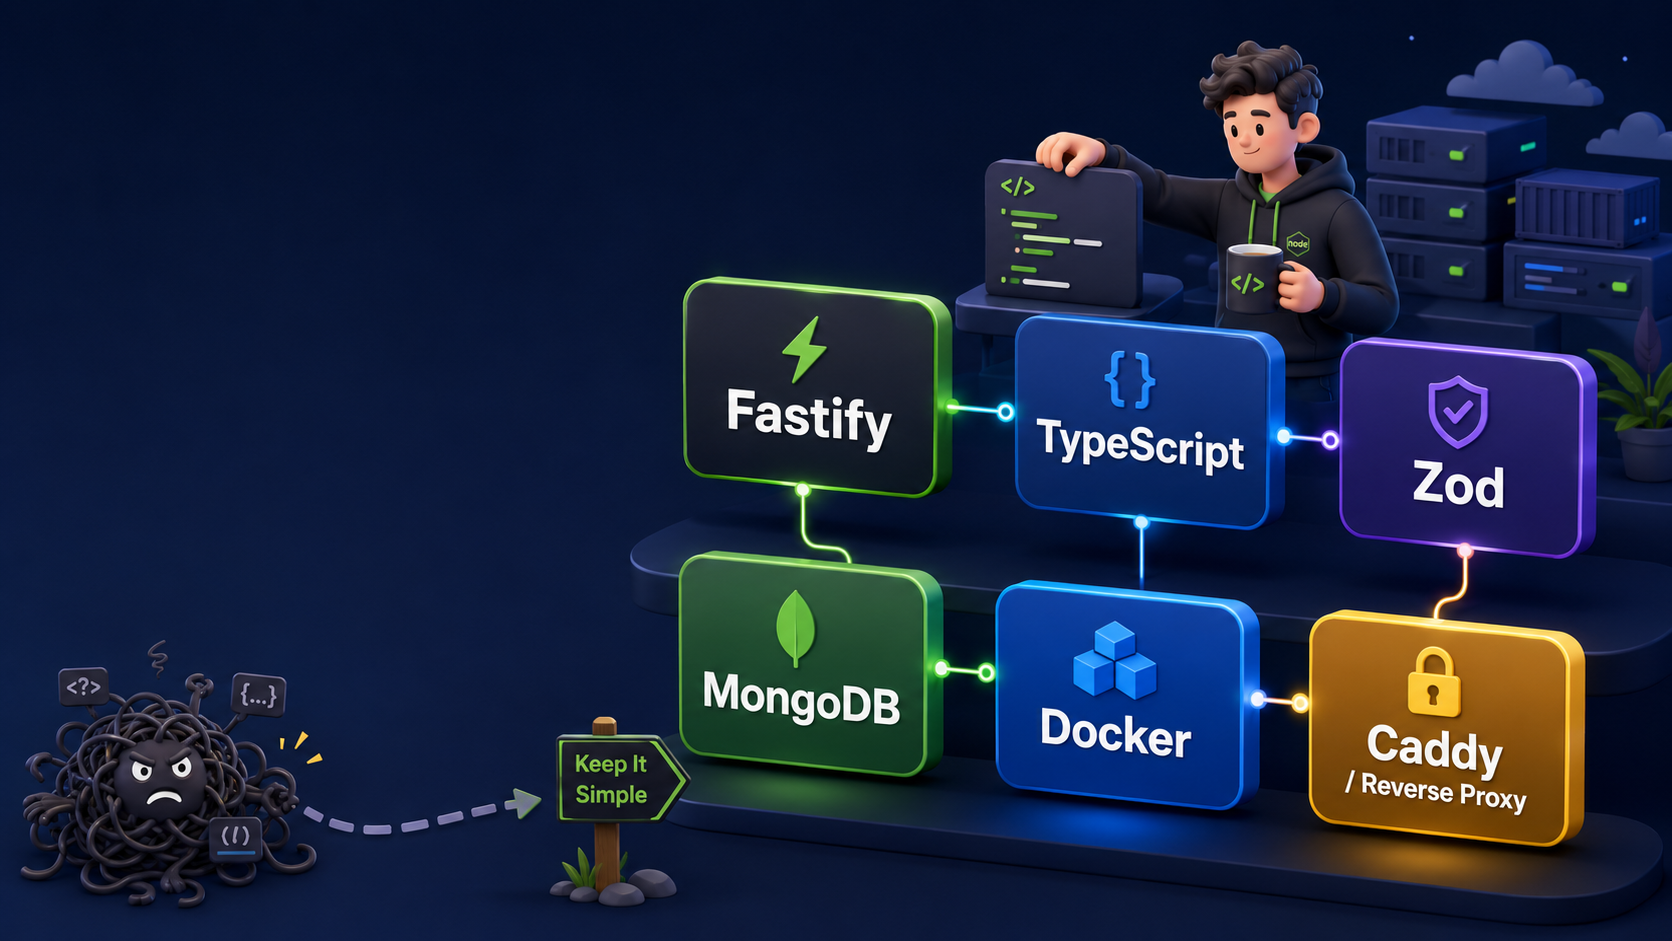
The Stack
We will use:
- Node.js for the runtime
- Fastify for the HTTP server
- Zod for validation
- SQLite for storage
- better-sqlite3 for simple database access
- @fastify/static to serve frontend files
- Caddy as the public reverse proxy
- systemd to keep the app alive on the VPS
This is a practical MVP stack.
It is small enough to understand, but real enough to publish.
The structure will look like this:
launchkit-landing/
├─ app.js
├─ package.json
├─ .env
├─ data/
│  └─ subscribers.db
└─ public/
   ├─ index.html
   ├─ styles.css
   └─ app.js
The backend lives in app.js.
The landing page lives in public/index.html.
The design lives in public/styles.css.
The browser form logic lives in public/app.js.
Step 1: Create the Project
Create a new folder:
mkdir launchkit-landing
cd launchkit-landing
Initialize Node:
npm init -y
Use ES modules:
npm pkg set type=module
Install dependencies:
npm install fastify @fastify/static zod better-sqlite3
Add a start script:
npm pkg set scripts.start="node --env-file=.env app.js"
Now create the folders:
mkdir public data
touch app.js public/index.html public/styles.css public/app.js .env
That is the skeleton.
No spaceship yet. Just the launchpad.
Step 2: Add Environment Variables
Open .env and add this:
PRODUCT_NAME="LaunchKit"
PRODUCT_TAGLINE="Validate your product idea before building the whole spaceship."
PORT=3000
HOST="127.0.0.1"
DB_FILE="./data/subscribers.db"
APP_SECRET="change-this-secret"
ADMIN_TOKEN="change-this-admin-token"
What these do:
PRODUCT_NAME      The name displayed on the page
PRODUCT_TAGLINE   The main description
PORT              The local port Node listens on
HOST              127.0.0.1 means only local machine access
DB_FILE           Where SQLite stores subscribers
APP_SECRET        Used to hash IP addresses
ADMIN_TOKEN       Used to protect admin endpoints
For local development, this is fine.
For production, change APP_SECRET and ADMIN_TOKEN to long random values.
Something like:
openssl rand -hex 32
Use that for your secrets.
Do not use password123.
That password has already emotionally retired.
Step 3: Build the Backend
Open app.js and paste this:
import Fastify from "fastify";
import fastifyStatic from "@fastify/static";
import Database from "better-sqlite3";
import { z } from "zod";
import { createHash, randomUUID, timingSafeEqual } from "node:crypto";
import { mkdirSync } from "node:fs";
import { dirname, join } from "node:path";
import { fileURLToPath } from "node:url";

const __filename = fileURLToPath(import.meta.url);
const __dirname = dirname(__filename);

const PORT = Number(process.env.PORT ?? 3000);
const HOST = process.env.HOST ?? "127.0.0.1";

const PRODUCT_NAME = process.env.PRODUCT_NAME ?? "LaunchKit";
const PRODUCT_TAGLINE =
  process.env.PRODUCT_TAGLINE ??
  "Validate your product idea before building the whole spaceship.";

const DB_FILE = process.env.DB_FILE ?? "./data/subscribers.db";
const APP_SECRET = process.env.APP_SECRET ?? "dev-secret-change-me";
const ADMIN_TOKEN = process.env.ADMIN_TOKEN ?? "";

mkdirSync(dirname(DB_FILE), { recursive: true });

const app = Fastify({
  logger: true,
  trustProxy: true,
});

await app.register(fastifyStatic, {
  root: join(__dirname, "public"),
  prefix: "/",
});

const db = new Database(DB_FILE);

db.pragma("journal_mode = WAL");

db.exec(`
  CREATE TABLE IF NOT EXISTS subscribers (
    id TEXT PRIMARY KEY,
    email TEXT NOT NULL UNIQUE,
    name TEXT,
    interest TEXT,
    source TEXT,
    ip_hash TEXT,
    user_agent TEXT,
    created_at TEXT NOT NULL DEFAULT (datetime('now'))
  );

  CREATE INDEX IF NOT EXISTS idx_subscribers_created_at
  ON subscribers(created_at);
`);

const insertSubscriber = db.prepare(`
  INSERT INTO subscribers (
    id,
    email,
    name,
    interest,
    source,
    ip_hash,
    user_agent
  )
  VALUES (
    @id,
    @email,
    @name,
    @interest,
    @source,
    @ip_hash,
    @user_agent
  )
`);

const countSubscribers = db.prepare(`
  SELECT COUNT(*) AS total FROM subscribers
`);

const latestSubscribers = db.prepare(`
  SELECT
    created_at,
    email,
    name,
    interest,
    source
  FROM subscribers
  ORDER BY created_at DESC
  LIMIT @limit
`);

const SubscriberSchema = z.object({
  email: z.string().trim().toLowerCase().email().max(255),
  name: z.string().trim().max(80).optional().default(""),
  interest: z.string().trim().max(500).optional().default(""),
  source: z.string().trim().max(120).optional().default("website"),

  // Honeypot field.
  // Humans do not see it.
  // Bots often fill it because bots have no chill.
  website: z.string().max(200).optional().default(""),
});

const recentHits = new Map();

function hash(value) {
  return createHash("sha256")
    .update(`${APP_SECRET}:${value}`)
    .digest("hex");
}

function isRateLimited(ip) {
  const key = hash(ip).slice(0, 32);
  const now = Date.now();

  const windowMs = 60_000;
  const maxRequests = 6;

  const hits = (recentHits.get(key) ?? []).filter(
    (timestamp) => now - timestamp < windowMs
  );

  hits.push(now);
  recentHits.set(key, hits);

  return hits.length > maxRequests;
}

const cleanupTimer = setInterval(() => {
  const now = Date.now();
  const windowMs = 60_000;

  for (const [key, hits] of recentHits.entries()) {
    const freshHits = hits.filter((timestamp) => now - timestamp < windowMs);

    if (freshHits.length === 0) {
      recentHits.delete(key);
    } else {
      recentHits.set(key, freshHits);
    }
  }
}, 60_000);

cleanupTimer.unref();

function safeCompare(a, b) {
  const first = Buffer.from(String(a ?? ""));
  const second = Buffer.from(String(b ?? ""));

  return first.length === second.length && timingSafeEqual(first, second);
}

function escapeCsv(value) {
  const text = String(value ?? "");

  if (/[",\n\r]/.test(text)) {
    return `"${text.replaceAll('"', '""')}"`;
  }

  return text;
}

async function requireAdmin(request, reply) {
  if (!ADMIN_TOKEN) {
    return reply.code(404).send({
      ok: false,
      message: "Admin routes are disabled. Set ADMIN_TOKEN first.",
    });
  }

  const authorization = request.headers.authorization ?? "";

  const bearerToken = authorization.startsWith("Bearer ")
    ? authorization.slice("Bearer ".length)
    : "";

  const queryToken = request.query?.token ?? "";
  const token = bearerToken || queryToken;

  if (!safeCompare(token, ADMIN_TOKEN)) {
    return reply.code(401).send({
      ok: false,
      message: "Unauthorized.",
    });
  }
}

app.get("/config.js", async (_request, reply) => {
  const publicConfig = {
    productName: PRODUCT_NAME,
    productTagline: PRODUCT_TAGLINE,
  };

  return reply
    .type("application/javascript; charset=utf-8")
    .send(`window.APP_CONFIG = ${JSON.stringify(publicConfig)};`);
});

app.get("/api/stats", async () => {
  return {
    ok: true,
    total: countSubscribers.get().total,
  };
});

app.get("/health", async () => {
  return {
    ok: true,
    product: PRODUCT_NAME,
    uptime: process.uptime(),
  };
});

app.post("/api/subscribe", async (request, reply) => {
  if (isRateLimited(request.ip)) {
    return reply.code(429).send({
      ok: false,
      message: "Easy there, launch rocket. Try again in a minute.",
    });
  }

  const parsed = SubscriberSchema.safeParse(request.body ?? {});

  if (!parsed.success) {
    return reply.code(400).send({
      ok: false,
      message: "Please enter a valid email address.",
    });
  }

  const subscriber = parsed.data;

  if (subscriber.website) {
    return reply.send({
      ok: true,
      message: "Thanks! You are on the list.",
    });
  }

  try {
    insertSubscriber.run({
      id: randomUUID(),
      email: subscriber.email,
      name: subscriber.name || null,
      interest: subscriber.interest || null,
      source: subscriber.source || "website",
      ip_hash: hash(request.ip).slice(0, 32),
      user_agent: request.headers["user-agent"] ?? "",
    });

    return reply.code(201).send({
      ok: true,
      message: "You are in! We will send useful updates, not inbox confetti.",
    });
  } catch (error) {
    if (error?.code === "SQLITE_CONSTRAINT_UNIQUE") {
      return reply.send({
        ok: true,
        message: "You are already on the list. Excellent taste, twice.",
      });
    }

    request.log.error(error);

    return reply.code(500).send({
      ok: false,
      message: "Something broke. A tiny goblin has been notified.",
    });
  }
});

app.get(
  "/admin/subscribers",
  { preHandler: requireAdmin },
  async (request) => {
    const requestedLimit = Number.parseInt(request.query?.limit ?? "100", 10);

    const limit = Number.isFinite(requestedLimit)
      ? Math.min(Math.max(requestedLimit, 1), 500)
      : 100;

    return {
      ok: true,
      total: countSubscribers.get().total,
      subscribers: latestSubscribers.all({ limit }),
    };
  }
);

app.get(
  "/admin/subscribers.csv",
  { preHandler: requireAdmin },
  async (_request, reply) => {
    const rows = latestSubscribers.all({ limit: 10_000 });
    const header = ["created_at", "email", "name", "interest", "source"];

    const csv = [
      header.join(","),
      ...rows.map((row) =>
        header.map((key) => escapeCsv(row[key])).join(",")
      ),
    ].join("\n");

    return reply
      .header("content-type", "text/csv; charset=utf-8")
      .header(
        "content-disposition",
        `${PRODUCT_NAME.toLowerCase()}-subscribers.csv`
      )
      .send(csv);
  }
);

try {
  await app.listen({ port: PORT, host: HOST });
} catch (error) {
  app.log.error(error);
  process.exit(1);
}
This backend does a lot for a small file:
- serves the landing page
- exposes public product config
- validates form submissions
- saves subscribers
- handles duplicate emails
- adds a simple rate limiter
- adds a honeypot spam field
- gives you subscriber stats
- gives you admin JSON export
- gives you admin CSV export
Not bad for one backend file.
The goblin is annoyed.
Good.
Step 4: Build the HTML
Open public/index.html:
<!doctype html>
<html lang="en">
<head>
  <meta charset="utf-8" />

  <meta
    name="viewport"
    content="width=device-width, initial-scale=1"
  />

  <title>LaunchKit — Join the early list</title>

  <meta
    name="description"
    content="Join the early access list for LaunchKit."
  />

  <link rel="stylesheet" href="/styles.css" />
  <script src="/config.js"></script>
  <script type="module" src="/app.js"></script>
</head>

<body>
  <div class="page-shell">
    <header class="nav">
      <a class="brand" href="/">
        <span class="brand-mark">✦</span>
        <span data-product-name>LaunchKit</span>
      </a>

      <span class="nav-badge">Early access is open</span>
    </header>

    <main class="hero">
      <section class="hero-copy">
        <p class="eyebrow">
          <span></span>
          New product brewing
        </p>

        <h1>
          Launch less.
          <strong>Learn more.</strong>
        </h1>

        <p class="subtitle" data-product-tagline>
          Validate your product idea before building the whole spaceship.
        </p>

        <p class="description">
          Join the early list and help shape what we build next.
          No spam. No corporate fog machine. Just useful updates.
        </p>

        <div class="proof-grid">
          <article>
            <strong data-subscriber-count>0</strong>
            <span>people already curious</span>
          </article>

          <article>
            <strong>5 min</strong>
            <span>to tell us what hurts</span>
          </article>

          <article>
            <strong>0%</strong>
            <span>overengineered nonsense</span>
          </article>
        </div>
      </section>

      <section class="signup-card" aria-label="Early access signup form">
        <div class="card-glow"></div>

        <div class="card-content">
          <h2>Get early access</h2>

          <p>
            Tell us where to send the good stuff. Bonus points if you tell us
            what problem you want solved.
          </p>

          <form data-signup-form>
            <label>
              Email
              <input
                name="email"
                type="email"
                placeholder="you@example.com"
                autocomplete="email"
                required
              />
            </label>

            <label>
              Name
              <input
                name="name"
                type="text"
                placeholder="Ada Lovelace"
                autocomplete="name"
              />
            </label>

            <label>
              What are you trying to solve?
              <textarea
                name="interest"
                placeholder="I want to validate my idea before building the entire app..."
              ></textarea>
            </label>

            <input type="hidden" name="source" value="website" />

            <label class="honeypot">
              Website
              <input
                name="website"
                type="text"
                autocomplete="off"
                tabindex="-1"
              />
            </label>

            <button type="submit">Join the early list</button>

            <p class="status" data-status></p>
          </form>
        </div>
      </section>
    </main>

    <section class="idea-map" aria-label="Landing page process">
      <div class="orbit">
        <article class="bubble bubble-1">
          <strong>Idea</strong>
          <span>Start with a promise.</span>
        </article>

        <article class="bubble bubble-2">
          <strong>Page</strong>
          <span>Explain it simply.</span>
        </article>

        <article class="bubble bubble-3">
          <strong>Waitlist</strong>
          <span>Capture real signal.</span>
        </article>

        <article class="bubble bubble-4">
          <strong>Build</strong>
          <span>Only after people care.</span>
        </article>

        <div class="rocket">🚀</div>
      </div>
    </section>

    <footer class="footer">
      Built with Node.js, SQLite, and a healthy fear of unnecessary complexity.
    </footer>
  </div>
</body>
</html>
This is plain HTML.
No frontend framework. No compiler. No ritual dance around a build tool.
The browser can understand this all by itself, because the browser is not a confused potato.
Step 5: Add the CSS
Open public/styles.css:
:root {
  color-scheme: dark;

  --bg: #08111f;
  --bg-soft: #101b2f;
  --card: rgba(255, 255, 255, 0.08);
  --card-border: rgba(255, 255, 255, 0.14);
  --text: #f6f7fb;
  --muted: #a8b3c7;
  --green: #7ee787;
  --blue: #75b7ff;
  --orange: #ffbd6b;
  --red: #ff7b72;

  --shadow: 0 24px 80px rgba(0, 0, 0, 0.35);
}

* {
  box-sizing: border-box;
}

body {
  margin: 0;
  min-height: 100vh;
  color: var(--text);
  font-family:
    Inter,
    ui-sans-serif,
    system-ui,
    -apple-system,
    BlinkMacSystemFont,
    "Segoe UI",
    sans-serif;
  background:
    radial-gradient(circle at top left, rgba(126, 231, 135, 0.18), transparent 34rem),
    radial-gradient(circle at bottom right, rgba(117, 183, 255, 0.16), transparent 32rem),
    var(--bg);
}

button,
input,
textarea {
  font: inherit;
}

a {
  color: inherit;
  text-decoration: none;
}

.page-shell {
  width: min(1120px, calc(100% - 32px));
  margin: 0 auto;
}

.nav {
  display: flex;
  align-items: center;
  justify-content: space-between;
  padding: 28px 0;
}

.brand {
  display: inline-flex;
  align-items: center;
  gap: 10px;
  font-weight: 900;
  letter-spacing: -0.04em;
}

.brand-mark {
  width: 38px;
  height: 38px;
  display: grid;
  place-items: center;
  border-radius: 14px;
  color: #06101f;
  background: linear-gradient(135deg, var(--green), var(--blue));
  box-shadow: 0 12px 40px rgba(126, 231, 135, 0.24);
}

.nav-badge {
  color: var(--muted);
  font-size: 14px;
  border: 1px solid var(--card-border);
  background: rgba(255, 255, 255, 0.05);
  padding: 8px 12px;
  border-radius: 999px;
}

.hero {
  display: grid;
  grid-template-columns: 1.05fr 0.95fr;
  gap: 52px;
  align-items: center;
  padding: 70px 0 86px;
}

.eyebrow {
  display: inline-flex;
  align-items: center;
  gap: 8px;
  width: fit-content;
  margin: 0;
  color: var(--green);
  background: rgba(126, 231, 135, 0.09);
  border: 1px solid rgba(126, 231, 135, 0.22);
  padding: 8px 12px;
  border-radius: 999px;
  font-weight: 800;
  font-size: 14px;
}

.eyebrow span {
  width: 8px;
  height: 8px;
  border-radius: 50%;
  background: var(--green);
  box-shadow: 0 0 20px var(--green);
}

h1 {
  margin: 22px 0 18px;
  max-width: 720px;
  font-size: clamp(44px, 7vw, 82px);
  line-height: 0.94;
  letter-spacing: -0.075em;
}

h1 strong {
  display: block;
  font-weight: 900;
  background: linear-gradient(135deg, var(--text), var(--green), var(--blue));
  -webkit-background-clip: text;
  background-clip: text;
  color: transparent;
}

.subtitle,
.description {
  max-width: 620px;
  color: var(--muted);
  font-size: 20px;
  line-height: 1.7;
}

.description {
  font-size: 18px;
}

.proof-grid {
  display: grid;
  grid-template-columns: repeat(3, 1fr);
  gap: 14px;
  margin-top: 28px;
}

.proof-grid article {
  border: 1px solid var(--card-border);
  background: rgba(255, 255, 255, 0.06);
  border-radius: 22px;
  padding: 18px;
}

.proof-grid strong {
  display: block;
  font-size: 28px;
  letter-spacing: -0.05em;
}

.proof-grid span {
  display: block;
  margin-top: 5px;
  color: var(--muted);
  font-size: 13px;
  line-height: 1.4;
}

.signup-card {
  position: relative;
  overflow: hidden;
  border: 1px solid var(--card-border);
  background:
    linear-gradient(180deg, rgba(255, 255, 255, 0.11), rgba(255, 255, 255, 0.06));
  box-shadow: var(--shadow);
  border-radius: 30px;
  padding: 26px;
  backdrop-filter: blur(18px);
}

.card-glow {
  position: absolute;
  inset: -2px;
  pointer-events: none;
  background:
    radial-gradient(circle at top left, rgba(126, 231, 135, 0.18), transparent 16rem),
    radial-gradient(circle at bottom right, rgba(255, 189, 107, 0.14), transparent 14rem);
}

.card-content {
  position: relative;
  z-index: 1;
}

.signup-card h2 {
  margin: 0 0 8px;
  font-size: 28px;
  letter-spacing: -0.05em;
}

.signup-card p {
  color: var(--muted);
  line-height: 1.6;
}

form {
  display: grid;
  gap: 14px;
  margin-top: 22px;
}

label {
  display: grid;
  gap: 7px;
  color: var(--muted);
  font-size: 14px;
  font-weight: 800;
}

input,
textarea {
  width: 100%;
  color: var(--text);
  border: 1px solid rgba(255, 255, 255, 0.14);
  background: rgba(8, 17, 31, 0.72);
  border-radius: 16px;
  padding: 14px 15px;
  outline: none;
}

textarea {
  min-height: 104px;
  resize: vertical;
}

input:focus,
textarea:focus {
  border-color: rgba(126, 231, 135, 0.72);
  box-shadow: 0 0 0 4px rgba(126, 231, 135, 0.11);
}

button {
  cursor: pointer;
  border: 0;
  border-radius: 16px;
  padding: 15px 18px;
  color: #06101f;
  background: linear-gradient(135deg, var(--green), var(--blue));
  font-weight: 950;
  letter-spacing: -0.03em;
  box-shadow: 0 16px 44px rgba(126, 231, 135, 0.2);
}

button:disabled {
  opacity: 0.68;
  cursor: not-allowed;
}

.status {
  min-height: 24px;
  margin: 4px 0 0;
  color: var(--muted);
  font-weight: 800;
}

.status[data-kind="success"] {
  color: var(--green);
}

.status[data-kind="error"] {
  color: var(--red);
}

.honeypot {
  position: absolute;
  left: -9999px;
  opacity: 0;
  pointer-events: none;
}

.idea-map {
  display: grid;
  place-items: center;
  padding: 12px 0 90px;
}

.orbit {
  width: min(100%, 680px);
  min-height: 420px;
  position: relative;
  overflow: hidden;
  border: 1px solid var(--card-border);
  border-radius: 42px;
  background:
    linear-gradient(135deg, rgba(255, 255, 255, 0.09), rgba(255, 255, 255, 0.035));
  box-shadow: var(--shadow);
}

.orbit::before {
  content: "";
  position: absolute;
  width: 310px;
  height: 310px;
  left: 50%;
  top: 50%;
  border-radius: 999px;
  border: 1px dashed rgba(255, 255, 255, 0.2);
  transform: translate(-50%, -50%);
}

.bubble {
  position: absolute;
  width: 170px;
  border: 1px solid var(--card-border);
  background: rgba(8, 17, 31, 0.78);
  border-radius: 22px;
  padding: 16px;
  box-shadow: 0 18px 54px rgba(0, 0, 0, 0.24);
}

.bubble strong {
  display: block;
  margin-bottom: 5px;
}

.bubble span {
  color: var(--muted);
  font-size: 13px;
}

.bubble-1 {
  left: 52px;
  top: 64px;
}

.bubble-2 {
  right: 52px;
  top: 88px;
}

.bubble-3 {
  left: 88px;
  bottom: 64px;
}

.bubble-4 {
  right: 82px;
  bottom: 54px;
}

.rocket {
  position: absolute;
  inset: 50%;
  width: 132px;
  height: 132px;
  display: grid;
  place-items: center;
  border-radius: 34px;
  font-size: 54px;
  background: linear-gradient(135deg, var(--green), var(--orange));
  transform: translate(-50%, -50%);
  box-shadow: 0 0 80px rgba(126, 231, 135, 0.25);
}

.footer {
  border-top: 1px solid rgba(255, 255, 255, 0.09);
  padding: 28px 0;
  color: var(--muted);
  font-size: 14px;
}

@media (max-width: 880px) {
  .hero {
    grid-template-columns: 1fr;
    padding-top: 36px;
  }

  .proof-grid {
    grid-template-columns: 1fr;
  }

  .orbit {
    min-height: 520px;
  }

  .bubble {
    width: 150px;
  }

  .bubble-1 {
    left: 22px;
    top: 42px;
  }

  .bubble-2 {
    right: 22px;
    top: 96px;
  }

  .bubble-3 {
    left: 24px;
    bottom: 80px;
  }

  .bubble-4 {
    right: 24px;
    bottom: 40px;
  }
}
Now the landing page has a real design.
Dark background. Bright accents. Big headline. Clean form. No corporate stock photo of five people pointing at a laptop.
We are safe.
Step 6: Add the Frontend JavaScript
Open public/app.js:
const config = window.APP_CONFIG ?? {};

const productNameElements = document.querySelectorAll("[data-product-name]");
const productTaglineElement = document.querySelector("[data-product-tagline]");
const subscriberCountElement = document.querySelector("[data-subscriber-count]");

for (const element of productNameElements) {
  element.textContent = config.productName ?? "LaunchKit";
}

if (productTaglineElement) {
  productTaglineElement.textContent =
    config.productTagline ??
    "Validate your product idea before building the whole spaceship.";
}

document.title = `${config.productName ?? "LaunchKit"} — Join the early list`;

async function updateStats() {
  try {
    const response = await fetch("/api/stats");
    const result = await response.json();

    if (result.ok && subscriberCountElement) {
      subscriberCountElement.textContent = result.total;
    }
  } catch {
    // Stats are nice to have, not critical.
  }
}

updateStats();

const form = document.querySelector("[data-signup-form]");
const status = document.querySelector("[data-status]");

if (form && status) {
  const sourceInput = form.querySelector('[name="source"]');

  const params = new URLSearchParams(window.location.search);
  const source = params.get("ref") || document.referrer || "website";

  sourceInput.value = source.slice(0, 120);

  form.addEventListener("submit", async (event) => {
    event.preventDefault();

    const button = form.querySelector("button");
    const formData = Object.fromEntries(new FormData(form));

    status.textContent = "Adding you to the list...";
    status.dataset.kind = "";
    button.disabled = true;

    try {
      const response = await fetch("/api/subscribe", {
        method: "POST",
        headers: {
          "content-type": "application/json",
        },
        body: JSON.stringify(formData),
      });

      const result = await response.json();

      status.textContent = result.message || "Done.";
      status.dataset.kind = result.ok ? "success" : "error";

      if (result.ok) {
        form.reset();
        sourceInput.value = source.slice(0, 120);
        updateStats();
      }
    } catch {
      status.textContent = "Could not connect. Please try again.";
      status.dataset.kind = "error";
    } finally {
      button.disabled = false;
    }
  });
}
This file does four useful things:
- Loads product name and tagline from the backend.
- Fetches the subscriber count.
- Sends the signup form to the API.
- Shows friendly success/error messages.
That is enough.
The MVP does not need a frontend state management library.
The current state is: “Did the person subscribe?”
We can manage that without summoning a dragon.
Step 7: Run the App Locally
Start the app:
npm start
Open:
http://localhost:3000
You should see your landing page.
Try submitting the form.
Then test the API:
curl -X POST http://localhost:3000/api/subscribe \
  -H "content-type: application/json" \
  -d '{
    "email": "ada@example.com",
    "name": "Ada",
    "interest": "I want to validate product ideas faster.",
    "source": "curl"
  }'
You should get:
{
  "ok": true,
  "message": "You are in! We will send useful updates, not inbox confetti."
}
Submit the same email again.
You should get:
{
  "ok": true,
  "message": "You are already on the list. Excellent taste, twice."
}
That means duplicate handling works.
A database constraint happened, but the user did not see a terrifying error.
This is called being polite.
Step 8: View Subscribers Locally
Use your admin token from .env:
curl http://localhost:3000/admin/subscribers \
  -H "Authorization: Bearer change-this-admin-token"
You should see something like:
{
  "ok": true,
  "total": 1,
  "subscribers": [
    {
      "created_at": "2026-06-28 12:00:00",
      "email": "ada@example.com",
      "name": "Ada",
      "interest": "I want to validate product ideas faster.",
      "source": "curl"
    }
  ]
}
Export CSV:
curl http://localhost:3000/admin/subscribers.csv \
  -H "Authorization: Bearer change-this-admin-token" \
  -o subscribers.csv
Now you have leads in a spreadsheet-friendly format.
This is the first tiny version of your customer database.
Do not lose it.
The first people who care about your idea are precious little internet diamonds.
Step 9: Prepare for Git
Create a .gitignore file:
touch .gitignore
Add:
node_modules
.env
data/*.db
data/*.db-shm
data/*.db-wal
npm-debug.log
.DS_Store
Why?
Because you do not want to commit:
- dependencies
- secrets
- production databases
- random local files
Commit the project:
git init
git add .
git commit -m "Build landing page MVP"
Now your app is ready to deploy.
Step 10: Get a VPS
You can use any VPS provider.
For a small landing page, the tiny machine is usually enough:
1 CPU
1 GB RAM
Ubuntu 24.04 LTS
You do not need a monster server for a landing page.
If your waitlist needs a bigger server on day one, congratulations, you have a different problem.
A better problem.
After creating the VPS, you should have:
Server IP address
Root SSH access
Ubuntu installed
Connect to the server:
ssh root@YOUR_SERVER_IP
Update packages:
apt update
apt upgrade -y
Create a non-root user:
adduser deploy
usermod -aG sudo deploy
Switch to that user:
su - deploy
From now on, avoid deploying everything as root.
Root is powerful.
Root is also how small mistakes become exciting incidents.
Step 11: Install Node.js on the VPS
Install basic tools:
sudo apt install -y curl git build-essential
The build-essential package is useful because better-sqlite3 may need native compilation depending on your environment.
Now install Node.js.
One simple way is using NodeSource or another trusted installation method. After installing Node, confirm:
node -v
npm -v
You want a modern Node version.
Node 20 or newer is a good target because we are using modern JavaScript and --env-file.
Step 12: Upload the Project to the VPS
There are two common ways.
Option A: Clone from Git
If your project is on GitHub or another Git server:
mkdir -p ~/apps
cd ~/apps
git clone YOUR_REPOSITORY_URL launchkit-landing
cd launchkit-landing
Option B: Copy Files with SCP
From your local machine:
scp -r ./launchkit-landing deploy@YOUR_SERVER_IP:/home/deploy/apps/
Then SSH into the server:
ssh deploy@YOUR_SERVER_IP
cd ~/apps/launchkit-landing
Install dependencies:
npm install --omit=dev
Create the data folder:
mkdir -p data
Create production .env:
nano .env
Add:
PRODUCT_NAME="LaunchKit"
PRODUCT_TAGLINE="Validate your product idea before building the whole spaceship."
PORT=3000
HOST="127.0.0.1"
DB_FILE="./data/subscribers.db"
APP_SECRET="paste-a-long-random-secret-here"
ADMIN_TOKEN="paste-a-different-long-random-token-here"
Generate proper secrets:
openssl rand -hex 32
openssl rand -hex 32
Use one for APP_SECRET.
Use the other for ADMIN_TOKEN.
Do not reuse the same one.
Secrets are like toothbrushes.
Sharing them is weird.
Step 13: Test the App on the VPS
From inside the project folder:
npm start
In another SSH session, test it:
curl http://127.0.0.1:3000/health
Expected response:
{
  "ok": true,
  "product": "LaunchKit",
  "uptime": 10.123
}
Stop the running app with:
Ctrl + C
Now we know the app works.
But we do not want to keep it alive manually.
We are not going to SSH into the server and whisper “please keep running” every night.
That is systemd’s job.
Step 14: Create a systemd Service
Create a service file:
sudo nano /etc/systemd/system/launchkit.service
Add this:
[Unit]
Description=LaunchKit Landing Page
After=network.target

[Service]
Type=simple
User=deploy
WorkingDirectory=/home/deploy/apps/launchkit-landing
ExecStart=/usr/bin/node --env-file=.env app.js
Restart=always
RestartSec=5
Environment=NODE_ENV=production

[Install]
WantedBy=multi-user.target
Important: check your Node path:
which node
If it is not /usr/bin/node, update ExecStart.
For example, if Node is installed somewhere else, use that path.
Now reload systemd:
sudo systemctl daemon-reload
Enable the service:
sudo systemctl enable launchkit
Start it:
sudo systemctl start launchkit
Check status:
sudo systemctl status launchkit
View logs:
journalctl -u launchkit -f
Your Node app is now supervised.
If it crashes, systemd restarts it.
The app has a babysitter now.
A serious Linux babysitter.
Step 15: Install Caddy
Your Node app listens on:
127.0.0.1:3000
That is good.
It means the app is not directly exposed to the internet.
Now Caddy will sit in front of it and handle public traffic, HTTPS, and reverse proxying.
Install Caddy using the official installation instructions for your server OS.
After installing, check:
caddy version
Then edit the Caddyfile:
sudo nano /etc/caddy/Caddyfile
Add:
yourdomain.com {
  reverse_proxy 127.0.0.1:3000
}
Replace:
yourdomain.com
with your real domain.
Reload Caddy:
sudo systemctl reload caddy
Caddy will handle HTTPS automatically when your domain points to the server correctly.
This is one of the reasons Caddy is lovely.
It does the certificate work while you drink coffee and pretend deployment was always this calm.
Step 16: Point Your Domain to the VPS
Go to your domain registrar or DNS provider.
Create an A record:
Type: A
Name: @
Value: YOUR_SERVER_IP
TTL: Auto
For www, either create another A record:
Type: A
Name: www
Value: YOUR_SERVER_IP
TTL: Auto
Or create a CNAME:
Type: CNAME
Name: www
Value: yourdomain.com
TTL: Auto
DNS can take a little time to update.
You can check it with:
dig yourdomain.com
Or:
ping yourdomain.com
Once the domain points to your VPS, visit:
https://yourdomain.com
If everything is correct, you should see your landing page live on the internet.
Congratulations.
Your idea has left your laptop.
This is a big moment.
The internet is now allowed to judge it.
Politely, we hope.
Step 17: Test Production Signup
Submit the form on the live site.
Then check the admin endpoint:
curl https://yourdomain.com/admin/subscribers \
  -H "Authorization: Bearer YOUR_ADMIN_TOKEN"
Export CSV:
curl https://yourdomain.com/admin/subscribers.csv \
  -H "Authorization: Bearer YOUR_ADMIN_TOKEN" \
  -o subscribers.csv
You now have a live landing page and a working subscriber system.
That is a real MVP.
Small, yes.
But real.
Step 18: Add Basic Firewall Rules
On Ubuntu, you can use UFW.
Allow SSH:
sudo ufw allow OpenSSH
Allow web traffic:
sudo ufw allow 80
sudo ufw allow 443
Enable firewall:
sudo ufw enable
Check status:
sudo ufw status
You do not need to expose port 3000.
Caddy talks to Node locally.
The outside world talks to Caddy.
This is cleaner and safer.
The outside world does not need to know your Node app is sitting there in sweatpants.
Step 19: Add Backups
Your subscriber database is just a file:
data/subscribers.db
That is convenient.
It also means you should back it up.
Create a backup folder:
mkdir -p ~/backups
Manual backup:
cp ~/apps/launchkit-landing/data/subscribers.db \
  ~/backups/subscribers-$(date +%F-%H%M).db
You can later automate this with cron.
For example:
crontab -e
Add:
0 3 * * * cp /home/deploy/apps/launchkit-landing/data/subscribers.db /home/deploy/backups/subscribers-$(date +\%F-\%H\%M).db
That creates a backup every night at 03:00.
Your future self will thank you.
Future self is usually tired and holding coffee.
Be kind to them.
Step 20: Updating the Landing Page
When you change your local code, commit it:
git add .
git commit -m "Improve landing page copy"
git push
On the server:
cd ~/apps/launchkit-landing
git pull
npm install --omit=dev
sudo systemctl restart launchkit
Check logs:
journalctl -u launchkit -f
If you only change HTML or CSS, you still restart the service to keep the workflow simple.
Could you make this more advanced?
Yes.
Should you?
Not yet.
We are validating an idea, not operating a space station.
What to Put on the Landing Page
The code matters, but the copy matters more.
A landing page should answer these questions quickly:
What is this?
Who is it for?
What problem does it solve?
Why should I care now?
What should I do next?
A good structure:
Headline:
  The main promise.

Subtitle:
  A simple explanation.

Benefits:
  3 things the user gets.

Form:
  Email + one useful question.

Social proof:
  Subscriber count, testimonials, screenshots, or founder note.

Call to action:
  Join the list.
For example:
Launch less. Learn more.

Validate your product idea before building the whole spaceship.

Join the early list and get practical tools for testing demand,
collecting feedback, and deciding what to build next.
That is clear.
Nobody needs to decode it like ancient developer poetry.
What Question Should You Ask Subscribers?
Do not only ask for email.
Ask one useful question.
Good examples:
What are you trying to solve?
What is the most annoying part of this problem?
How do you solve this today?
What would make this useful for you?
What kind of product are you building?
That one extra field can teach you more than analytics.
Analytics tells you what people clicked.
Their answer tells you what they care about.
That is gold.
Tiny messy human gold.
What to Do After Publishing
Once your landing page is live, your job changes.
You are no longer just coding.
Now you are learning.
Share the page:
- on X/Twitter
- on LinkedIn
- in niche communities
- with friends who fit the audience
- in founder groups
- in developer communities
- in newsletters
- in relevant Reddit communities, carefully and respectfully
- directly with people who have the problem
Do not spam.
Do not run into communities yelling “CHECK OUT MY STARTUP.”
That is not marketing.
That is a digital seagull attack.
Instead, be useful.
Say what you are building, who it is for, and what kind of feedback you want.
Example:
I am testing an idea for indie hackers who want to validate product ideas before building the full app.

I made a tiny landing page and I am collecting early feedback.

If you have tried validating a product idea before, I would love to know what made it painful.
That is much better.
Human. Clear. Not weird.
How to Know If the Landing Page Is Working
Do not only count page views.
Page views are nice, but they can lie.
Better signals:
- people subscribe
- people write thoughtful answers
- people reply to your follow-up email
- people ask when it will launch
- people describe the pain clearly
- people share the page
- people ask about pricing
- people say, “Can I try it?”
The strongest signal is not:
Cool idea.
The strongest signal is:
I need this. When can I use it?
That is the sound of an MVP doing its job.
What Not to Add Yet
Please do not immediately add:
- user accounts
- OAuth
- subscriptions
- dashboards
- admin roles
- Kubernetes
- queues
- microservices
- GraphQL
- dark/light/system theme preference syncing across devices
- a plugin marketplace
- a mascot with lore
You are building a landing page.
The page has one job:
Find out if people care.
Everything else is optional until the signal is strong.
The overengineering goblin will whisper:
But what if we need scale?
Tell the goblin:
If we need scale, that means the landing page worked.
Then continue.
When to Improve the MVP
Improve the MVP when you learn something.
For example:
If visitors do not subscribe, improve the headline.
If visitors subscribe but write vague answers, improve the question.
If people ask the same thing repeatedly, add that to the page.
If people want pricing, add a pricing question.
If people ask for a demo, build a tiny demo.
If nobody cares, change the idea or audience.
That is the loop:
Publish
Share
Measure
Talk
Learn
Improve
Repeat
This loop is more important than the tech stack.
The tech stack is just the bicycle.
The learning loop is the road.
Production Checklist
Before you share the page widely, check this:
[ ] Domain points to VPS
[ ] HTTPS works
[ ] Form submits successfully
[ ] Duplicate emails are handled
[ ] Admin token is not the default value
[ ] APP_SECRET is not the default value
[ ] SQLite database is stored in data/
[ ] Firewall allows only SSH, HTTP, HTTPS
[ ] systemd service restarts app
[ ] Caddy proxies to 127.0.0.1:3000
[ ] CSV export works
[ ] You have a backup plan
[ ] The headline is clear
[ ] The call to action is obvious
This is enough for an MVP.
Not perfect.
Enough.
Perfect is where shipping goes to die wearing a nice suit.
Final Thoughts
A landing page is not “just a page.”
It is a test.
It tests whether your idea makes sense to people who are not trapped inside your head.
That is valuable.
With this small Node.js MVP, you can:
- explain your idea
- collect interested subscribers
- store useful feedback
- export leads
- publish to a VPS
- run behind HTTPS
- keep the app alive with systemd
- avoid building a giant thing too early
This is how you go from:
I have an idea.
to:
People are signing up.
That is a meaningful step.
Not because the code is fancy.
Because the idea is finally touching reality.
So build the page.
Publish it.
Share it.
Talk to the people who sign up.
Then build the product they are already trying to pull out of you.
And whatever you do, do not feed the overengineering goblin after midnight.
Actually, do not feed it at all.